已解决问题集
问题:如何 detach 嵌套的 tmux 会话?
退出 tmux 嵌套步骤:本地机器打开一个 tmux:local,ssh 登录到远程机器,再次打开一 个 tmux:remote;如果需要退出 tmux:remote,那么需要本地的 tmux 不要捕获 C-b 前缀, 使用以前的命令:
# set prefix key to Ctrl-t
unbind C-b
set -g prefix C-t
# send the prefix to client inside window
bind-key -n C-a send-prefix
问题:Emacs 下如何配置 rtags + irony + company?
llvm-config
yum install -y clang-devel llvm-develrtags
git clone --recursive https://github.com/Andersbakken/rtags.git
cd rtags && git checkout -b v2.8
mkdir build && cd build && cmake -DCMAKE_EXPORT_COMPILE_COMMANDS=1 ..
make -j4
sudo make install
bear
wget -c https://github.com/rizsotto/Bear/archive/2.2.1.tar.gz -O Bear-2.2.1.tar.gz
tar xf Bear-2.2.1.tar.gz
cd Bear-2.2.1
mkdkir build && cd build
cmake ..
make -j4 all
make check   # to run tests
sudo make install # to install
emacs-25.1
wget -c http://ftp.gnu.org/gnu/emacs/emacs-25.1.tar.xz
tar xf emacs-25.1.tar.xz
cd emacs-25.1
./configure --with-x-toolkit=no --with-xpm=no --with-png=no --with-gif=no --with-tiff=no
make -j4
sudo make install
irony
M-x irony-install-servercmake-ide
在每个项目下需要设置一个 .dir-locals.el
((nil . ((cmake-ide--locate-project-dir . "/abs/path/to/project/")
         (cmake-ide-build-dir . "/abs/path/to/project/build/"))))
问题:CentOS-7 如何将系统时间设置为硬件时间?
sudo hwclock --hctosys
假设现在系统时间和硬件时间分别是:
硬件时间:10:57 系统时间:10:59
那么在运行sudo hwclock --hctosys之后,这两个时间分别是:
硬件时间:10:57 系统时间:10:57
问题:CentOS-7 如何将硬件时间设置为系统时间?
解决方法:
sudo hwclock --systohc
假设现在系统时间和硬件时间分别是:
硬件时间:11:06 系统时间:11:09
那么在运行sudo hwclock --systohc之后,这两个时间分别是:
硬件时间:11:09 系统时间:11:09
问题:vagrant 管理的 centos/7 的虚拟机相互间 ssh 不能登录
详细描述:
运行ssh vagrant@192.168.33.41,出现如下的错误信息:
Permission denied (publickey,gssapi-keyex,gssapi-with-mic).
解决方法:
node0$ ssh-keygen
node0$ cat .ssh/id_rsa.pub # 这里拷贝输出的内容
node1$ echo "这里是刚才拷贝的内容" >> .ssh/authorized_keys
node0$ ssh vagrant@192.168.33.41 # 现在应该可以登录了
问题:vagrant 如何从 centos/7 base box 制作定制的 box?
解决方法:
mkdir test
cd test
vagrant init centos/7
vagrant up
vagrant ssh # 这里会进入虚拟机

...install your own package...
cd
curl https://raw.githubusercontent.com/mitchellh/vagrant/master/keys/vagrant.pub >> ~/.ssh/authorized_keys

sudo dd if=/dev/zero of=/zero bs=4K # 这样可以减少镜像占用的空间
sudo rm -f /zero
sudo yum clean all
sudo rm -fr /tmp/* /var/log/* ~/.viminfo ~/.pki
history -c && truncate -s 0 ~/.bash_history && history -c
C-d # 这里会退出虚拟机,在宿主机器上执行下面的命令

打开 VirtualBox,修改虚拟机的名字,下面打包要填写这个名字
vagrant package --base devel --output centos-7-devel.box
vagrant box add centos-7-devel centos-7-devel.box

mkdir ../test2
cd ../test2
vagrant init centos-7-devel
vagrant up
vagrant ssh # 进入定制的虚拟机中
问题:vagrant 从 centos/7 的基础上制作 base box,vagrant up 不能完成
详细描述:
vagrant package --base devel --output centos-7-devel.box
vagrant box add centos-7-devel centos-7-devel.box
mkdir test
cd test
vagrant init centos-7-devel
vagrant up运行以上的命令之后,vagrant up不能完成,一直出现以下的信息:
“Warning: Authentication failure. Retrying… “
解决方法:
curl https://raw.githubusercontent.com/mitchellh/vagrant/master/keys/vagrant.pub >> /home/vagrant/.ssh/authorized_keys
mkdir -m 0700 -p /home/vagrant/.ssh
chmod 600 /home/vagrant/.ssh/authorized_keys
chown -R vagrant:vagrant /home/vagrant/.ssh
参考链接:
问题:vagrant 如何使用 scp 将文件从宿主机器传输到虚拟机器?
解决方法:
vagrant ssh-config > vagrant-ssh-config
scp -F vagrant-ssh-config -r Tools default:~/
问题:如何在 CentOS-7 安装支持 tcp/udp 负载均衡的 nginx?
在 /etc/yum.repo.d/ 目录下新建一个 nginx.repo 的文件,这个文件的内容如下:
[nginx]
name=nginx repo
baseurl=http://nginx.org/packages/mainline/centos/7/$basearch/
gpgcheck=0
enabled=1
然后用 root 用户运行 yum update nginx
问题:tmux 多终端输入相同的命令非常繁琐
解决方法:
tmux 提供了在多个 pane 输入命令的功能,使用下面的命令开启:setw synchronize-panes
问题:CentOS-7 系统上,使用systemctl start nginx启动失败
详细描述:
[root@CentOS7 nginx]# systemctl status -l nginx
● nginx.service - The nginx HTTP and reverse proxy server
   Loaded: loaded (/usr/lib/systemd/system/nginx.service; disabled; vendor
   preset: disabled)
      Active: failed (Result: exit-code) since Mon 2016-08-29 09:23:00 CST; 43s ago
        Process: 9833 ExecStartPre=/usr/sbin/nginx -t (code=exited,
        status=1/FAILURE)
          Process: 9831 ExecStartPre=/usr/bin/rm -f /run/nginx.pid (code=exited, status=0/SUCCESS)
          Aug 29 09:23:00 CentOS7 systemd[1]: Starting The nginx HTTP and reverse proxy server...
          Aug 29 09:23:00 CentOS7 nginx[9833]: nginx: the configuration file /etc/nginx/nginx.conf syntax is ok
          Aug 29 09:23:00 CentOS7 nginx[9833]: nginx: [emerg] bind() to 0.0.0.0:20000 failed (13: Permission denied)
          Aug 29 09:23:00 CentOS7 nginx[9833]: nginx: configuration file /etc/nginx/nginx.conf test failed
          Aug 29 09:23:00 CentOS7 systemd[1]: nginx.service: control process exited, code=exited status=1
          Aug 29 09:23:00 CentOS7 systemd[1]: Failed to start The nginx HTTP and reverse proxy server.
          Aug 29 09:23:00 CentOS7 systemd[1]: Unit nginx.service entered failed state.
Aug 29 09:23:00 CentOS7 systemd[1]: nginx.service failed.问题分析:
nginx 服务启动失败,是因为绑定到端口 20000 失败了。之所以会失败,是因为启用了 selinux,它会要求绑定到 1~50000 的端口都需要 root 权限。
解决方法:
禁用 selinux:
$ sestatus
root# sed -i 's/SELINUX=.*$/SELINUX=disabled/' /etc/selinux/config
root# reboot
$ sestatus
问题:如何模拟网络断开的情况?
解决方法:
使用 iptables 屏蔽某个节点的网络包,掌握常用的命令:
root# iptables -L # 列出 iptables 的过滤规则
root# iptables -A INPUT -s <ipaddr> -j DROP # 将来自 <ipaddr> 的网络包都丢弃
root# iptables -F # 关闭掉所有的规则
问题:VMWare Workstation 克隆虚拟机后,没有 IP 地址
详细描述:
- VMWare Workstation: 8.0.0 build-471780
- Host OS: Windows 7 Ultimate, 64-bit 6.1.7601, Service Pack 1
- Guest OS: CentOS-6.5
解决方法:
DEVICE="eth0"
BOOTPROTO=none
ONBOOT=yes
MTU="1500"
NETMASK=255.255.255.0
IPADDR=192.168.37.201
HWADDR="00:0C:29:5F:20:D5" # 这里填写的是 MAC 地址
TYPE="Ethernet"
GATEWAY=192.168.37.2
问题:如何打包一个系统压缩包,以便可以方便地制作 docker 镜像?
解决方法:
$ cd /
$ sudo tar czpf backup.tar.gz --exclude=/backup.tar.gz --one-file-system /问题:在 docker 容器内不能访问本地文件系统
详细描述:
环境: CentOS-7.0, Docker-1.10.3
使用 docker run -v /path/to/local:/path/to/docker images /bin/bash启动容器,在
容器内部不能访问本地文件系统中的目录,出现的错误信息是:
ls: cannot open directory /mnt: Permission denied
解决方法:
chcon -Rt svirt_sandbox_file_t /path/to/local
问题分析:
这个问题是由 selinux 导致的。需要往 selinux 加一个规则使之可以访问。
问题:进程发生 coredump,但没有生成 core 文件
详细描述:
在 CentOS-6.5 中,系统默认是关闭 coredump 核心存储的,也就不会产生 core 文件。进 程发生 coredump 后,没有生成 core 文件。
解决方法:
$ sudo echo 'kernel.core_pattern = %e-%u-%s-%t.core' >> /etc/sysctl.conf
$ sudo sysctl -p
$ echo "ulimit -c unlimited >/dev/null 2>&1"
问题:[Errno -1] Package does not match intended download.
详细描述:
使用 sudo yum install mutt 时,出现如上的错误
问题分析:
因为镜像站点和主站点没有同步,所以需要等待一段时间以便数据同步(通常是几个小时)。
解决方法:
等待镜像站点更新,或者下载包括依赖在内的 rpm 包进行安装。
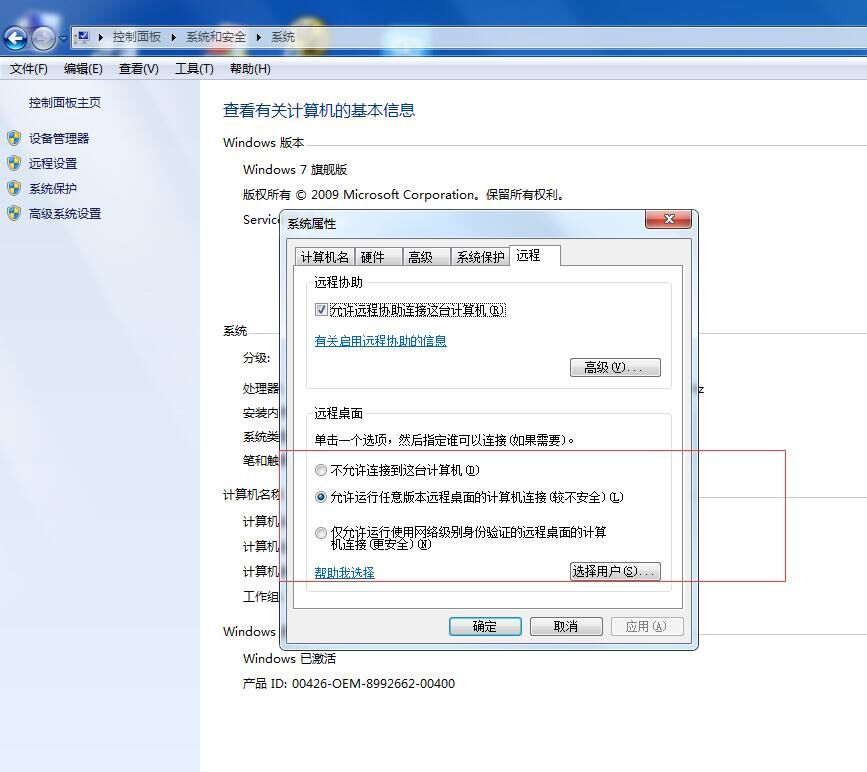
问题:在 Windows 7 系统中,远程桌面不能成功连接
解决方法:
问题:安装 docker 重启后,运行docker images出现错误
详细描述:
Cannot connect to the Docker daemon. Is the docker daemon running on this host?
解决方法:
sudo docker service start
问题分析:
由于 docker 没有加入自动启动,需要手动启动。
问题:使用 CentOS-7 时,由于对 yum/rpm 使用不熟悉,影响效率
解决方法:
掌握常用的命令:
- 查看工具是由哪个包提供的:
yum whatprovides */netstat - 查看包的信息:
yum info emacs - 查看所有的仓库列表:
yum repolist - 搜索软件包:
yum search emacs - 清理缓存:
yum clean all - 查询软件包是否已经安装:
yum info emacs或者rpm -qa | grep emacs - 列出已安装软件包的文件:
rpm -ql emacs - 列出 rpm 包的文件:
rpm -qf emacs.rpm - 查询不是从源安装的包:
rpm -qa --qf '%{NAME} %{VENDOR}'\n | grep -v CentOS
问题:在 CentOS-7 中使用 emacs-24.5.1 打开 Windows 下的文件,出现乱码
详细描述:
emacs-24.5.1 是使用源码编译安装的,编译的过程如下:
emacs-24.5$ ./configure --with-x-toolkit=no --with-xpm=no --with-png=no \
--with-gif=no --with-tiff=no
emacs-24.5$ make
emacs-24.5$ sudo make install
文件在 Windows 下使用 emacs-24.5.1 创建和编辑,使用 Git 推送到仓库,在 CentOS-7 中使用 Git 拉取下来。
解决方法:
安装对应的字体:sudo yum groupinstall "Fonts",然后在打开的文件中输入M-x
revert-buffer-with-coding-system gbk-dos。
问题分析:
在 CentOS-7 中 Emacs 默认没有使用正确的 gbk-dos 进行解码,相反地错误地使用了 iso-latin-1-dos 进行解码,因此它会出现乱码。由于知道在 Windows 下是使用 gbk 进行 编码的,因此使用正确的解码方法,就可以看到正常的文字了。
问题:docker pull ubuntu:14.04出现错误
详细描述:
OS: Ubuntu 14.04.1 LTS
Docker: 1.11.0, build 4dc5990
Error response from daemon: unauthorized: Authentication is required: Get https://registry-1.docker.io/v2/library/ubuntu/manifests/14.04: unauthorized: incorrect username or password
解决方法:
$ docker logout
$ docker login
问题分析:
由于重置了 Docker Hub 的密码,原有的密码不能登录。
问题:emacs-24.5.1 使用 magit-status,查看变更时,背景高亮非常影响阅读
解决方法:
禁用背景高亮。在 Emacs 中,执行 M-x customize,在搜索框中输入magit,在出现的
字段中,找到 Magit Item Highlight,将它的背景颜色禁用。
问题:如何自动部署静态博客文章到 Nginx?
解决方法:
# adduser git
# su - git
git$ git init --bare blog.git
git$ cat > blog.git/hooks/post-receive << EOF
#!/bin/sh

PATH=$HOME/bin:$PATH

BLOG_BARE_REPO=$HOME/blog.git
BLOG_BUILD_REPO=$HOME/buildblog
PUBLIC_WWW=/var/www

git clone $BLOG_BARE_REPO $BLOG_BUILD_REPO
jekyll build -s $BLOG_BUILD_REPO -d $PUBLIC_WWW
rm -fr $BLOG_BUILD_REPO

exit
EOF
git$ exit
# mkdir /var/www
# chown git:nginx /var/www
# chmod 0755 /var/www
设置完了 Git 之后,开始设置 Nginx:
server {
    listen 16328;
    index index.html index.htm;
    location / {
        root /var/www;
    }
}user$ git remote add deploy git@localhost:~/blog.git
user$ git push deploy master问题分析:
由于使用 Git 管理博客文章,那么需要在推送到服务端后,执行生成静态页面,然后将生 成的静态页面放到 Nginx 能够访问的目录中。
问题:如何在 CentOS-7 系统中,搭建一个本地的 Github 博客?
解决方法:
$ gem install bundler
$ mkdir newsite && cd newsite && git init
$ cat > Gemfile << EOF
source 'https://ruby.taobao.org/'
gem 'github-pages', group: :jekyll_plugins
EOF
$ bundle install
$ bundle exec jekyll serve
问题分析:
由于 Github Page 使用 Jekyll 搭建静态博客,而 Jekyll 依赖 Ruby 的开发包。由于需 要在本地搭建一个博客,那么也需要将 Github 的主题下来回来。
问题:在 CentOS-7 系统中,运行 gem install jekyll 失败
详细描述:
ERROR: Could not find a valid gem ‘jekyll’ (>= 0), here is why:
Unable to download data from https://rubygems.org/ - Errno::ECONNRESET: Connection reset by peer - SSL_connect (https://rubygems.org/latest_specs.4.8.gz)
解决方法:
$ gem sources -r https://rubygems.org/
$ gem sources -a https://ruby.taobao.org/
问题分析:
由于防火墙屏蔽了 rubygems.org。
问题:在 CentOS-7 系统中,官方源没法安装 nodejs
解决方法:
$ sudo yum install epel-release
$ sudo yum install nodejs
$ node --version
$ sudo yum install npm
问题:在 CentOS-7 系统中,安装后时间不一致
解决方法:
$ sudo yum install -y ntpdate
$ sudo ntpdate pool.ntp.org
$ sudo crobtab -e
30 * * * * ntpdate pool.ntp.org
$ sudo hwclock -w
问题:docker pull centos:7 无法完成
详细描述:
在 CentOS-7 中,安装官网的教程安装完了 docker 之后,使用 docker pull centos-7 不 能完成。安装和运行的命令如下:
$ curl -fsSL https://get.docker.com/ | sh
$ docker pull centos:7
解决方法:
$ sudo service docker start #1问题:编译 zeromq-4.1. 时,不能找到 libsodium,但它已安装
问题详细描述:
在编译 zeromq-4.1.4 之前,已经手动编译安装了 libsodium-1.0.10
libsodium-1.0.10$ ./configure && make
libsodium-1.0.10$ sudo make install
libsodium-1.0.10$ ls /usr/local/lib
libsodium.a  libsodium.la*  libsodium.so@  libsodium.so.18@
libsodium.so.18.1.0*  pkgconfig/
libsodium-1.0.10$ ls /usr/local/lib/pkgconfig
libsodium.pc
解决方法:
zeromq-4.1.4$ PKG_CONFIG_PATH=/usr/local/lib/pkgconfig ./configure原因分析:
在编译 zeromq 时,编译系统使用 pkg-config 来查找需要的库。但是 pkg-config 默认的 搜索路径不包括 /usr/local/lib/pkgconfig。
问题:CentOS-7 安装完了之后,不能进行开发工作
解决方法:安装开发包
使用 yum 安装的软件包:
$ sudo yum groupinstall "Development Tools"
$ sudo yum install zlib-devel bzip2-devel openssl-devel ncurses-devel \
    readline-devel tk-devel libpcap-devel xz-devel libxslt-devel libxml2-devel \
    libjpeg-devel libcurl-devel
$ sudo yum install tmux cmake cmake-doc
手动编译的软件包:
emacs global nginx zeromq
问题:VMWare Workstation 8 安装 CentOS-7 没找到网卡
问题:在 VMWare Workstation 8 中,使用 minimal 镜像安装完 CentOS-7 之后,系统启 动后没有找到网卡。
解决方法:
在网络上找到这个解决方法: 问题:Vmware无法识别网卡,导致虚拟机无法上网
打开虚拟机配置文件(.vmx),在配置文件中加入一行:
ethernet0.virtualDev = “e1000”
值为”e1000”指定网卡类型为Intel(R) PRO/1000 值为”vlance”指定网卡类型为AMD PCNet AM79C970A(默认为此项不兼容) 值为”vmxnet”指定网卡类型为VMware PCI Ethernet Adapter
原因分析:
Vmware虚拟网卡和linux兼容问题导致驱动无法正常安装,默认的网卡类型不兼容
问题:Python InsecurePlatformWarning
问题:在 CentOS-6.5 中,运行 pip install 时,出现如下的警告:
/usr/lib/python2.6/site-packages/pip/vendor/requests/packages/urllib3/util/ssl.py:90: InsecurePlatformWarning: A true SSLContext object is not available. This prevents urllib3 from configuring SSL appropriately and may cause certain SSL connections to fail. For more information, see https://urllib3.readthedocs.org/en/latest/security.html#insecureplatformwarning.
解决方法:
- 升级到 Python 2.7.9
- pip install –upgrade requests[security]
问题:aptitude update出现“无法重建软件包缓存”
问题描述:
见标题
解决方案:
- 换一个服务器
- 等待一段时间(几个小时或者几天),故障服务器可能会被修复
问题:wireshark启动后不能看到设备列表
问题详细描述:
在 ubuntu-14.04 系统中,使用 sudo aptitude install wireshark 安装之后,启动
wireshark,不能看到可以捕获的设备列表。
解决方案:
$ sudo dpkg-reconfigure wireshark-common # 允许普通用户捕获设备
$ sudo usermod -a -G wireshark $USER
$ sudo reboot